How to make a Killer Combination Sky
A step by step method with no geek speak - Part 1
Bryce
By Paul Pappathan a.k.a. Pinhead
Programs:
Bryce 3, 4, 5
Photoshop 5, 6, 7 Paint Shop Pro - PSP 5 and 6
User Level: Intermediate
This is intended to show all
users how to create, and use, a volumetric symmetrical lattice with a volume
cloud plane to get dramatic skies in Bryce.
Note: You will need
Photoshop, PSP or any graphics program that supports layers and masks to do
Part Two. This tutorial will give fine results without the last step if you
don't - so hang in there Brycers!
: : : Section One - The Setup : : :
1) Take, Make, Scan or find on the web, a decent picture of
clouds with good contrasts and color. Whatever you use, Save it!
You will need it for Part
Two - "Enhancing your Image"
The I used for in this tutoriaI I made -
Feel free to use without restriction.
512 x 512 pixels by 96 dpi
work fine though any size will do.
The bigger the better.
(Download cloudtestPC.zip or
cloudtestMac.zip
either is fine, just different lzw compression)
2) Start up Bryce, it will work a lot better heh! Then click Sky&Fog
.
Load the Sky Preset Simple Black
Background and next click on the ground plain and delete it. Really.
3) Switch to Camera View
4) Click on Create, then the Symmetrical Lattice icon.
A Sym
Lat will drop into the center of the scene.
5) Important ! Click the
Edit icon and flatten the Lattice as much as possible by Left click, hold down
and dragging to the left on the RESIZE "Y" until the lattice is very
thin.
6)Click the [A] Attributes
next to the lattice.
In the Rotate "
X"
box type in 90, in "Y" type in 45 and in "
Z" -180 (That's
minus 180 in "Z").
Hit the check mark at the
lower right to exit Attributes.
Now, on the main Bryce
screen, click the up arrow to center the lattice.
FYI: The above steps make
the lattice so it's perfectly aligned with the default Camera View.
: : : Section Two - The Material and Terrain : : :
Ok all...you have this
little sym lattice just sitting there looking like a blob of nothing with a
crappy mat on it.
Right? Let's fix it good!
Now Pay *very* close
attention class . . . Class?...CLASS!. . . Wake UP!
Hahahahahahahaaa. Sorry, got
carried away teaching myself. What a pinhead.
1)Click the [E] Edit Object next to the symmetrical lattice.
This will bring up the Terrain Editor.
Click on the word "Grid" and select Massive
Resolution.
Below Grid is a small down
arrow (VERY IMPORTANT), Click it and please select Solid.
FYI: This is where most
folks make an error - when you are going to use a picture texture on a
volumetric terrain you must make it Solid or it will be Invisible. Strange but
true.
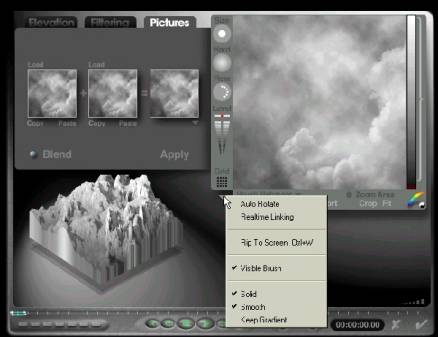
2) Click on the Pictures tab and next hit the word Load on the
first (far left) small preview box.
In the following dialog
browse and find the cloud picture you have decided to use, select it and push
the Open button.
The Cloud Picture should now
be loaded into the first preview box on the left.
3) Click on Copy beneath the same preview and next Click Paste
in the Middle Preview box.
Click Apply and watch the
terrain take the form of the clouds grayscale information. Cool eh?
Hit the check mark at the
bottom right to Exit the Terrain Editor.
This is a good point to save
the file.
4) Back in the Bryce main screen, click the [M] Edit Material
symbol.
In the Material Lab - below -please
Reset to the Default Material by clicking the small button to the far *left* of
the word Volume.
In the "A" column click on Diffuse, Ambient and
Transparent in the Color channel.

In the Value Channel select Diffusion Only and make
sure its value is 100!
Slide the Ambience control to 0 (zero).
Down at the bottom Refraction should be at 100.
*** All other items should deselected and have a
value of ZERO ***
FYI: Pic\images have plenty
of native ambience that you picked up in the Color channel above.
5) At the top right of the Mat Lab click on the small letter
"P" beneath the first Material (Texture "A") preview area.
Hey it's Leo! Say Hi Leo!
"Hi Leo".
To the right of the
"P" is a small button with a white down arrow that selects the
picture mapping mode.
Click it and select Object Top! The scaling
must be on "0".
To the left of the preview
is another damn arrow (*Material Options).
Left click it and Deselect
Cast Shadows.
FYI: The Lattice was originally lying flat with the
"X" plane facing up remember?
*This section is also
where you would select Blend Transparency if you were making a lattice model.
6) Straight up above the letter "P" and the small
preview of Leo (say "Bye Leo" LOL.) is another button, which gets you
into the Picture Source Editor. Hit it.
7) Click on any blank square above in the
Pic Editor (Or the word Load
above Leo) and you will get a similar dialog as when you applied the picture to
the lattice in the Terrain Editor.
Find the same image and
click Open.
The full color picture
should now show in the first preview box on the top left. Click the word Copy
below the picture and next click Paste at the bottom of the Middle Preview.
When the warning comes up
asking "Are you sure you want to delete?"
Hit Delete!
Click the check mark on the
bottom left to Exit the Picture Source Editor.
8) Meanwhile back to the Mat Lab. . . the
material is now applied
to the Lattice as a Surface material.
Go see for yourself, resize
it to fill the screen and start a render.
I can wait.
(I really want you to see
the difference when you use a picture as a volume material...please do the
above so you can compare)
Now many will think that the
image looks ok but it Doesn't!
I can be improved greatly by
doing the following...
9) Click the [M] next to the lattice again and return to the Mat
Lab.
Next to the small material
preview window at the top left you will see the word Surface embossed above a
clear sphere.
Click on the Sphere to flip
into Volumetric Mode.
Don't panic - the materials
still there! Trust me. Hahahahaha.
!Important!
Reduce the Fuzzy Factor to
"0" and slide the Quality up to 100.
Click the check mark to Exit
and take a look now by starting another render.
Great stuff!
You can now move and resize
the lattice as you wish for your scene.
Make sure you check the [A]
Attributes when you resize and keep the lattice thin on the "Y" size
for best results.
The most thicknessI allow for a sky
lattice is a value of 0.50 in "Y" size.
FYI: When used on very
thin Lattices, Volumetric picture textures render faster and look 10 times
better than surface mats!
: : : Section Three - Adding Depth and Drama : : :
1) Move the Lattice back, up, down, rotate, resize as needed to
make room and provide focus on the cloud features you want in your image.
Click on Create, Left click,
Hold down on the Cloud plane and select Volume.
Probably looks like hell
eh?...the plane must be rotated and a suitable texture applied.
2) Click the [M] next to the Volume cloud plane and go into the
Bryce Material Presets and select Incoming Sunset.
In the Material Lab:
Increase the Transparency to
about 10, you don't want to hide the features of the lattice, just add some
depth and shadows.
Exit the Material Lab.
3) The following is to speed up positioning/sizing the cloud
plane.
I am sure you can do this by
eye!
Click the [A] next to the
cloud plane, in the
Size boxes type these values,
| X 45 | Y 15 | Z 45 |
In the Rotate boxes;
| X -30 | Y -15 | Z -100 |
In the Origin;
| X -5 | Y 50 | Z 30 |
The above values will add a
mild streaming light effect as well as casting shadows and adding depth.
Click the check mark to
Apply and exit the settings box.
4) Click on Sky &Fog. Pick a shadow and
Sun color.
Whatever color you choose
will change the appearance dramatically.
I used an RGB value of
255,232,160 for a golden light effect.
A very slight haze (1 to 3)
will add to valley/terrain features.
Here is the Sky result.
FYI:I always reduce the shadow value to at least 60.
The Bryce default of 90 is much too high and hides texture
features.
5) Make a dramatic mountain.
Click on Create > Terrain;
Make a
primary terrain, Click [E] next to the terrain to go to the Terrain Editor.
Make sure you have the
Elevation Tab selected.
Click Grid and select 256 -
fine.
From the Fractal (small down
arrow) Select Alpine Valleys.
Click the Fractal button a
few times - look for a good center area, don't worry about the outside edges.
Once you see something you
like hit Gaussian Edges once then click the Eroded (NOT Erode!) button once
also.
Click Basic and Slope Noise
2 times each for character.
Hit the check mark to Exit.
6) Use 3-4 terrains sized/flattened as needed to fill the
foreground.
Make one large terrain in
the 'background' as the focus for the clouds.
Make sure you don't cut the
terrains into the cloud lattice!
I would suggest using Frank
Allen's, MarioG or maybe my terrain mats if you're not sure how to use the DTE at this time.
Below is the final result
that I got using all of the above . . .my own mats being the only exception.

I hope this gave you some
ideas as to how effective using a single lattice and a volume cloud plane can
be.
Part Two will continue
with how to add cloud layers in a graphics editor to add a final Killer touch to
your scene...
Render on and have fun! See
you soon in school.
I'll be the kid in the corner with broken knuckles.
Hahahahhahahahaaa.... yeeeeeouch
Pinhead - Updated December 13 2006