Part 2
Working with Atmosphere
I
think the default sky should be changed.
Seeing how's I'm the one writing this I
can do whatever I want.
Within limits...I am a cruel and demanding
person as well as obscenely obnoxious
; )
Let's mess with a preset sky so you can
check out the neato things you can do.
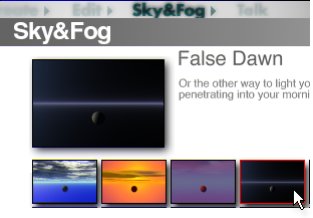
On the Top Bryce Toolbar select Sky&Fog,
then click the little arrow to the right.
 |
This
brings you to the Sky&Fog Preset
library - not any different from the
material presets in function.
Select False Dawn (I once knew a girl...nevermind,
too easy to make a joke here)
Click the checkmark to load the preset
into your scenareeno.
|
Once
you have the new sky loaded everything
will go dark - don't panic! It's only
make believe..
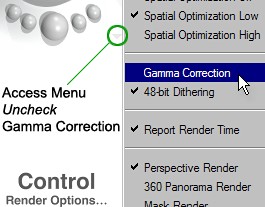
Deselect Gamma Correction.
It's supposed to be dark out ; )
You can find it at the drop down list
under Render Options.
Lights will be added later to highlight
the scene. |
 |
Cloud Control - Sky Lab
 |
Click the little cloud to enter the
Sky Lab.
You can also get there by key combo
Ctrl+K or from the top menu Objects
> Sky Lab.
Tip: Hold down Ctrl+Alt and double click
on the Sun\Moon sphere. If you Shift+Ctrl+Alt
left click in the main window it will
place the moon wherever you want.
|
Sun & Moon
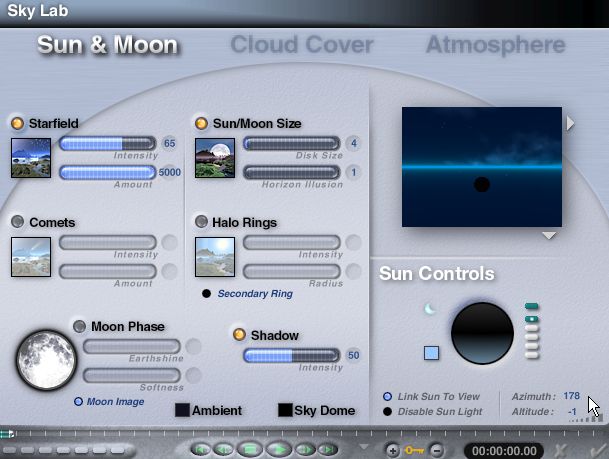
Star fields usually doesn't
look so hot but in this case it will work
because of the wide angle.
Sun/Moon Size is up to
you - my intent was to make it appear
on the horizon at a great distance.
Use Moon Image.
Why? Because it's there and I don't see
many moons that look like a searchlight.
Reduce Shadow from the
heavy handed 100% default.
Azimuth controls the horizontal
(left-right) position of the moon on the
horizon line (in this case). A setting of
180 is dead center. Having it set slightly
off center keeps me from getting a headache
; )
[ Real definition of azimuth:
The azimuth of a celestial body is the
angle between the vertical plane containing
it and the plane of the meridian ]
Altitude controls the
Height. -1 is used here because
the Moon is near total opposition to the
Sun at 178 degrees. |
Cloud Cover and da DTE
|
Deselect
Cumulus...we don't need 'em.
Let's alter the Stratus cloud type slightly
to make it match the scene better,
Clouds are editable in the DTE just
like any other material.
It's much easier to change the direction
and amount of noise in the DTE than
by mucking around with rotation and
scale in the Mat Lab. No kiddin.
Click the word Edit
as shown. |
Oooooooh nooooooooooooooooooooo
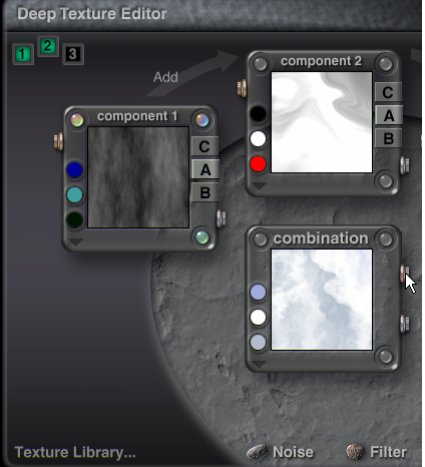
It's
the DTE.
 |
I'm
doing this just to scare you!
On the left you can see that the stratus
clouds are made up of 2 noise patterns.
The combinations possible are near infinite
but are easy to control if you know what
you want.
We want a 'thin' atmosphere so
the moon and stars will show through.
It would also be cool to have the cloud
forms appear to be zooming out from the
moon slightly. |
Texture
Library:
Save stuff you make in the DTE just as
you do in any other Preset Library.
Click the button shown above to get a
more suitable preset (.brt) to use.
|
To
DTE Presets
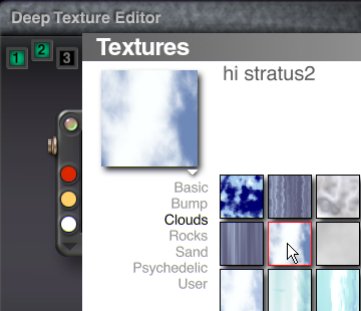 |
Hey!
Lookee - more stuff!
These are the 'raw' textures that make
up Bryce procedural materials.
hi stratus2 has the characteristics
needed.
Click Clouds then the small thumb image
for hi stratus2.
Click the checkmark at bottom
right to confirm and Exit.
You will be returned to the Deep Texture
Editor. |
I want my DTE
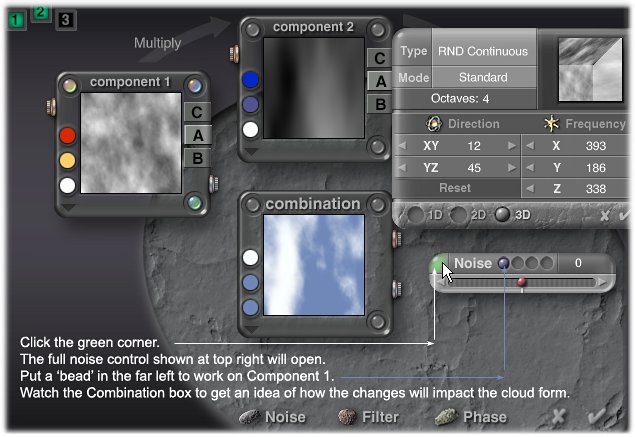 |
HEY,
what's all this junk???
This is what I did to hi stratus. If you
compare it to the original you will note
I opened up the 'blue' area.
(the blue area is transparent in the scene...
the letter [A] highlighted in Comp 1 and
2 means use only the Alpha
value)
Check the settings of both Components
1 and 2 and compare them to the original
hi stratus2.
Apply and Exit the DTE. |
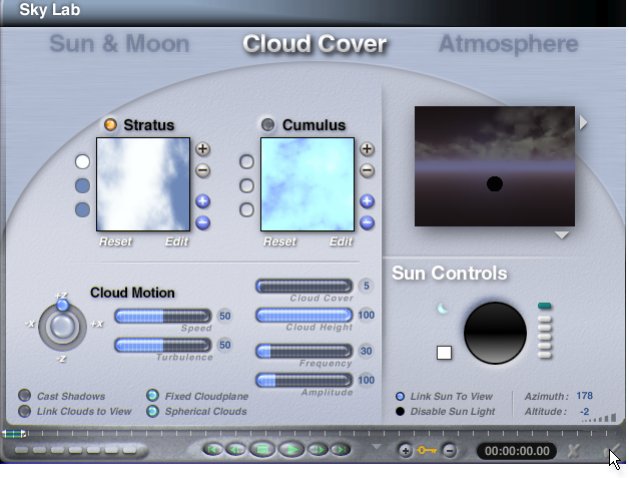
Finishing the Cloud Cover Settings
|
High
thin clouds with moderate motion seem
to fit this scene.
Reduce Cloud Motion Speed
and Turbulence accordingly.
Cloud Cover = 5 or
less
Cloud Height at maximum
of 100
Frequency around 30
Amplitude (how dense\opaque
the actual cloud material appears) should
be low also.
Spherical Clouds makes
the clouds global just like real life
; )
Fixed Cloudplane =
Optional:
When you move up\in\out inside a Bryce
scene, the clouds move also.
It looks like you’re getting closer
or further from the clouds.
If you want to stop this from happening
you can select the Fixed Cloudplane.
This prevents the cloud formation from
changing as you move around the scene.
Kinda... |
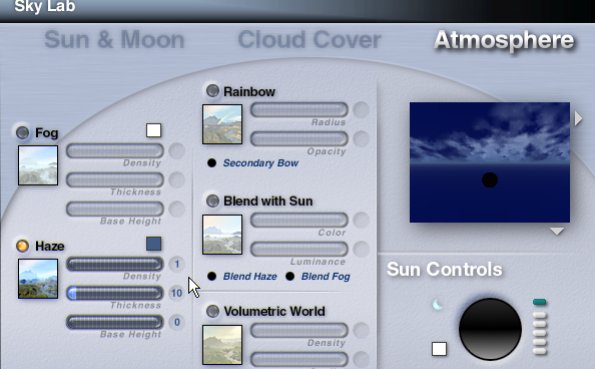
Atmosphere
|
Trying
to control Haze from the main work area
is an exercise in futility.
Use the settings above and alter later
if you want.
If Blend with Sun is selected
- deSelect.
The basic settings for the Sun/Moon, Clouds
and Atmosphere are done.
The color theme will be set back in the
main screen
You can hit the check mark now and exit
the Sky Lab...yaaaaaaaaaaaaaaaaaay!..
|
Atmosphere
|
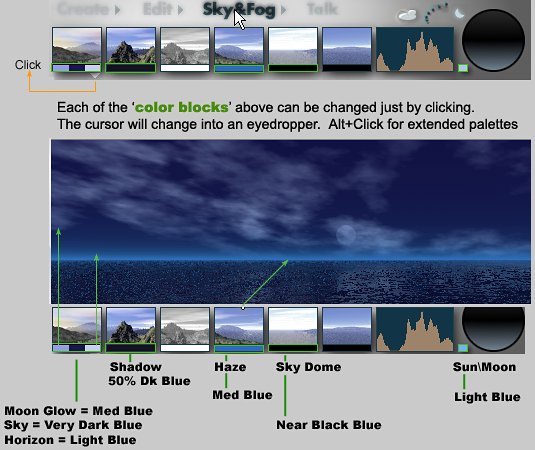
The
sky color I used is near black with dark
blue to show stars.
To access custom sky settings click the
down arrow beneath the first box at top
left.
Horizon color affects the fade from the
horizon line to low clouds
Haze has a major impact, it's global.
The Sky Dome is the 'Environment color'.
Think of it as a big color sphere surrounding
the scene.
Sun\Moon color is self explanatory - I hope...hahahaha.
Use whatever color theme appeals to you
- these are used just to illustrate the
methods. |
Onto Part 3 - Pain, Terrains and Light


Pinhead
- March 2005
Some more of my idiocy here. . .
|