How to make those fancy 2d objects for Bryce
or
Tifs with Transparency Masks and how they relate to the Brycean Universe
or
Pinhead Visits Pansieland
Pinhead © April 2002 to sometime in 2006
With information from Nitroced (thank you!) for PS ver 6Click Here to open alternate instructions for Photoshop 6 if you are having trouble saving the tif result correctly.
Ever wonder how they made those coolio 2d objects on the Bryce 4 and 5 CD's?
I wanted to make my own very low weight 2d objects though.
Things like skulls, bones and gravestones. The cheery stuff they didn't have.
Thus I went and found one on the CD and tore it apart. . .Aha!
Nothing to it. Literally!
It's as simple as black and white. Another mystery shattered. Shucks.
All you need is a photo edit program which supports layers and channels.
Photoshop or Paint Shop Pro work fine. I'm sure there's others.
The Mysterious Alpha Channel is what makes this work.
We're going to use a pretty purplish flower (yuck) for the example.
Why you ask? Because it's free!
My skull ain't....Yet.
I'll let you know when it's available.
We can begin now, I'm done babbling.
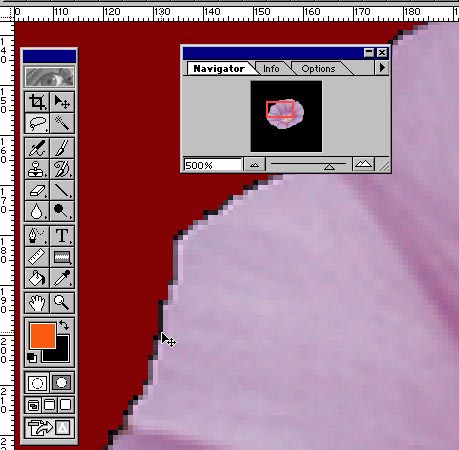
1.0 Soooooo...here's the picture I started with, copy it if you want to follow along:
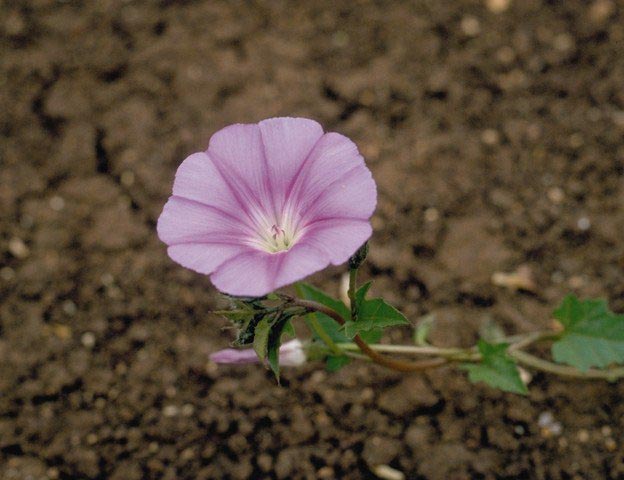
Told ya it was icky but it will have to do.
[yes, I took the damn picture and you can have it]
2.0 Start up Photoshop and File > Open. . .Find the image you want or use the above.
This is important! On whatever selection tool you use,
Deselect Anti-alias or the edges of the image will appear black when rendered in Bryce.
This is also something to keep in mind on images prepared for lattice use.
Make sure your background color is pure black.
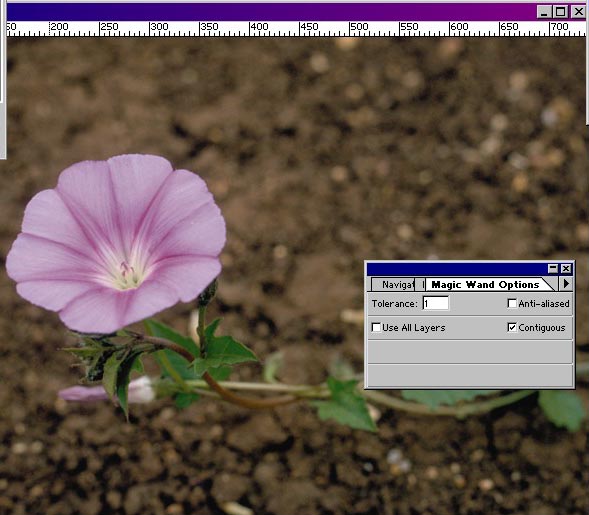
Anti-Aliasing makes a near invisible grayscale ramp along the edge - don't use it for this!
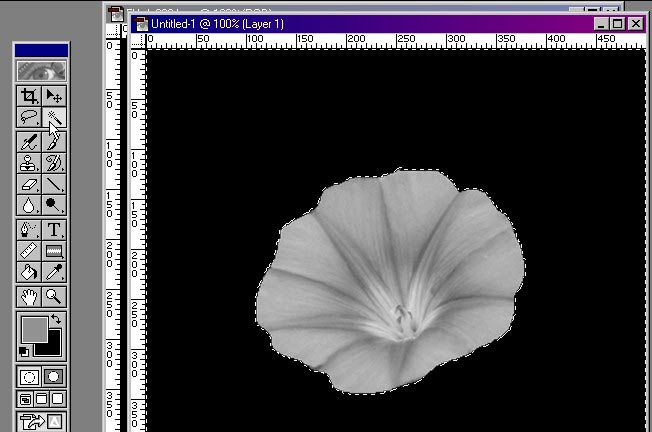
3.0 Double Click the Lasso (note the option settings)
and select all around the object.
Just left click, hold down and trace.
You don't have to be terribly neat, just make sure you're in the color area
and not outside what you want to select.
I typically trace along the inside as seen below to avoid blurry edges.
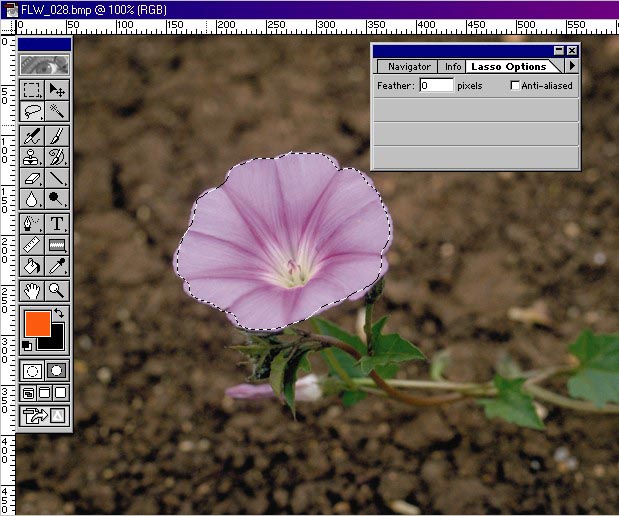
Lousy DOF and focus eh? I need glasses, Pilsner will do.
4.0 After you have made your way all the way around
let up the mouse/tablet and the edges should join.
If you have to add to the selection hold down Crtl
and simply pick up what you might have missed.
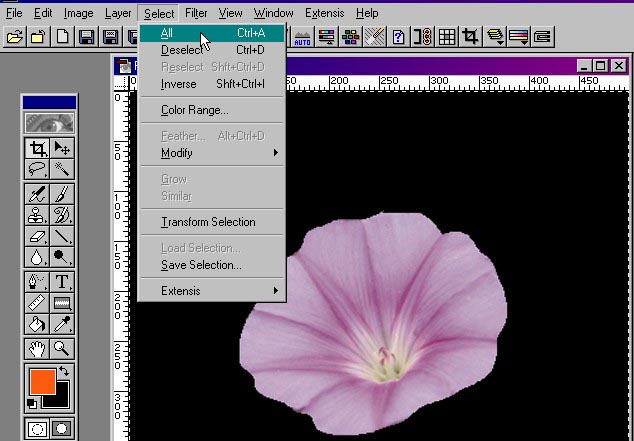
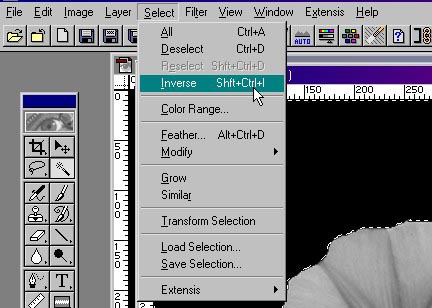
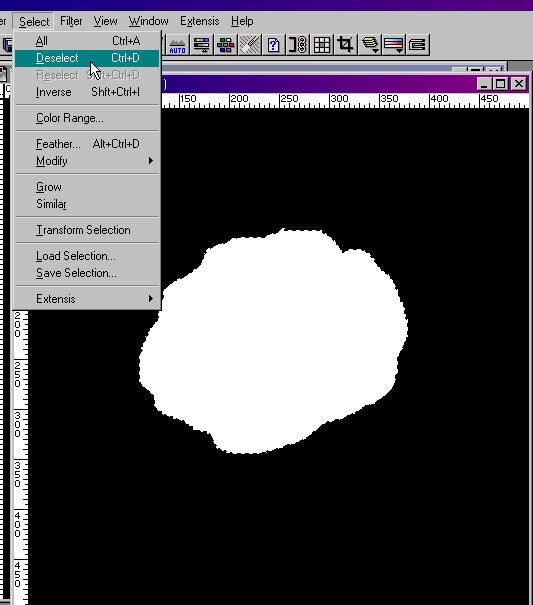
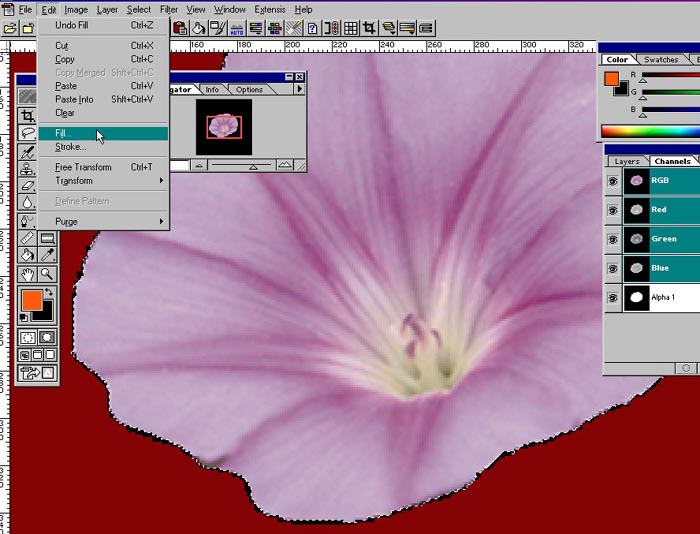
Now, Select > Inverse so the outside space, not the flower, is active.
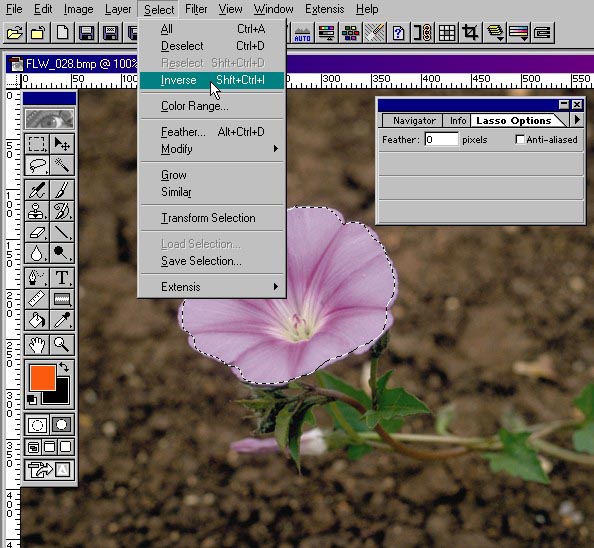
I'm not giving the shortcut keys because they are different in each program...and I'm a lazy typist.
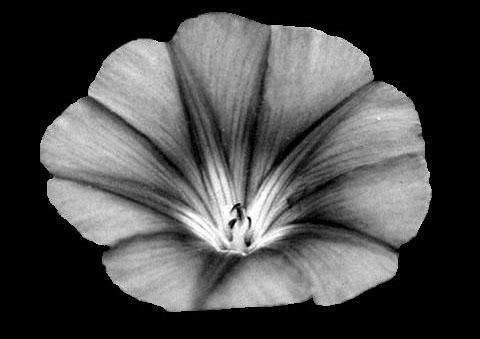
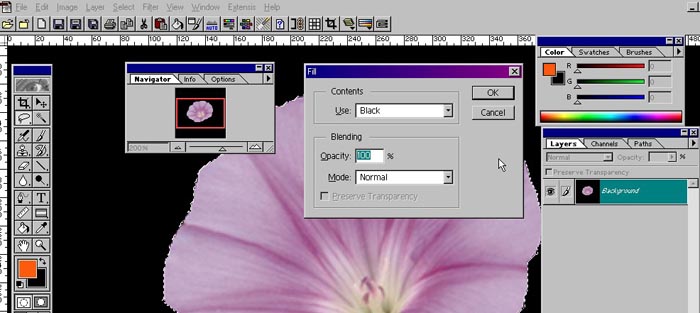
5.0 Next go to Edit > Fill. The background has to be wiped out.
You can also 'cut' the background out using Edit > Cut or Ctrl+X...I stress, the background must be Pure Black.
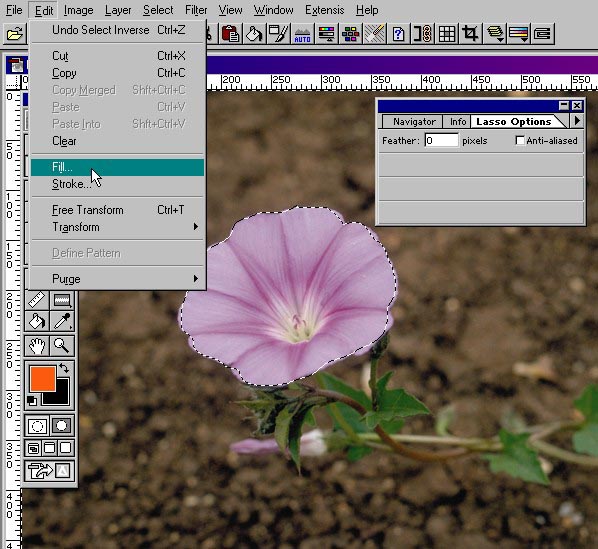
Many might know this but I'd rather not assume. Right?
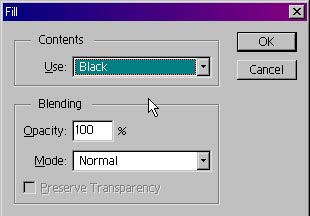
6.0 Fill the selected area [formerly known as out of focus background stuff] with 100% Black.
Doing this a couple of times wont hurt.
Even with anti-alias off, 100% black doesn't cover the edges completely.
7.0 Crop the image so it's more manageable.
The closer to the edge of the object the better.
I'm using fixed target size auto crop here because when I did this picture
I was working on a bunch of photos that I wanted precisely the same size.
You, however, can make these any size you wish. Just crop the image when done.
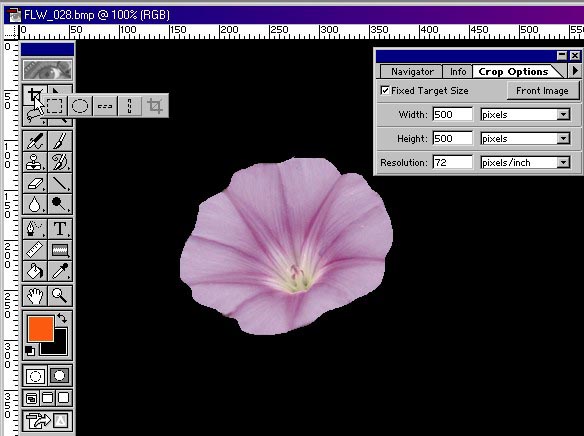
Simply deselect fixed target size for normal cropping function.
Hey! Still with me here??? This is Exciting stuff!!!
8.0 Okay, Select > All.
9.0 and then Edit > Copy (Ctrl C) the image. . .
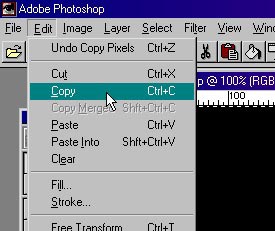
Hey, I used a damn shortcut key!
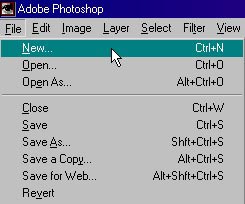
10.0 Go to File > New
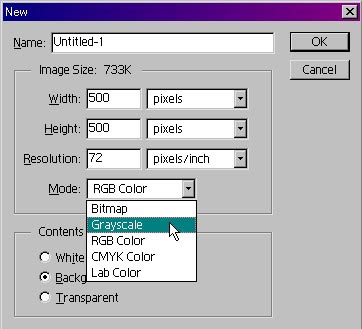
11.0 Make sure it's the same size and Select Grayscale Mode.
12.0 Edit > Paste the image you copied in step 9 into the new Untitled Grayscale image.
If you forgot to copy go back and do so now - no harm done. Yet.
Select the black area outside the flower with the Magic Wand tool.
Do you see the slight gap around the selection? This is what causes black edges.
13.0 Select > Inverse. . .Sound familiar? The flower should be the active selection.
Drift away for a second here!
SAVE a copy of this grayscale as a bump map and base for a lattice or terrain model.
With the flower selected invert the values then make it very high contrast.
Here's what it should look like (I'll show how to apply it in Bryce later).
Okay, back to the regularly scheduled programming!
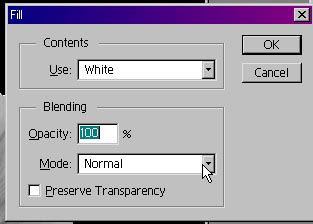
14.0 Edit > Fill the flower area selected with 100% pure white.
15.0 Select > Deselect (gee, that seems self negating doesn't it?)
Oh well, I didn't develop the Sanglaigs language. I is smarterer then that.
16.0 Go to Layer > Flatten.
Make sure you do this or it won't work,
it will look right in Photoshop but will not work in Bryce.
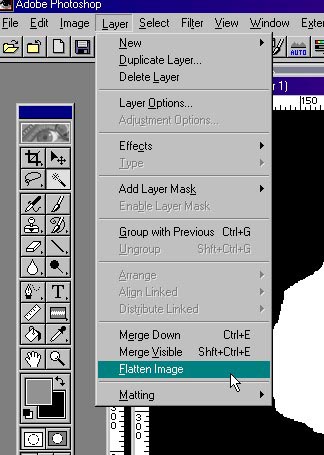
You have to flatten it here because it was pasted onto a background - the image became Layer 1.
17.0 Now, please go back to the Original Image and make a new ALPHA Channel as shown.
Don't worry, the color image will still be there.
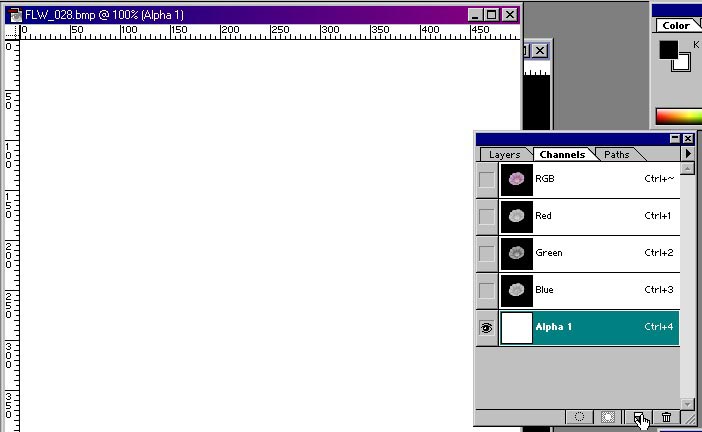
The little hand above shows where to create the alpha in the Channel sub-palette.
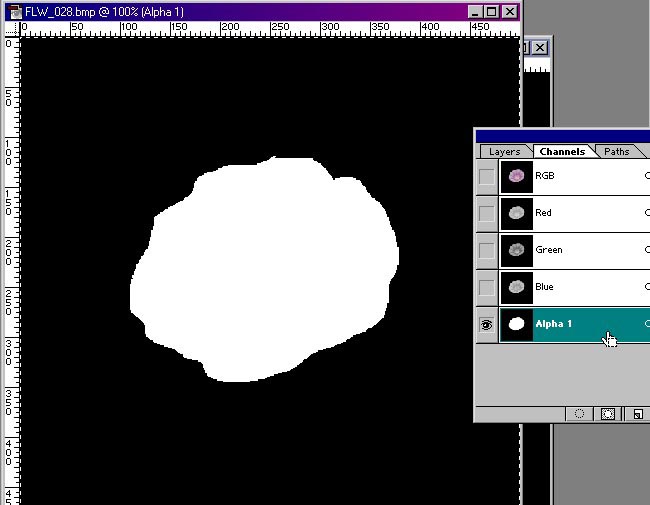
18.0 Go back to your untitled black and white image(alpha mask)
Edit >Copy then Paste it into Alpha Channel 1 of the Color image.
Click RGB up top in the Channel palette...
19.0 Because the Alpha is still active the background will be red.
Zoom in close here.
You can easily see where the edges must be cleaned up.
Do so, using the lasso tool, again selecting the color edge of the flower.
Make sure the background selection is active before proceeding,
you have to fill the background again, not the flower, after this.
Invert the selection if needed!
20.0 With all Channels active, Edit > Fill.
Please note how the icky, lousy, rotten, stinkin flower is outlined.
The Black edge is active outside the color! Fill with 100% Black again.
21.0 Next Click on the Layers Tab and then on the small Background thumbnail.
Fill again several times with 100% Black!!
Seems like overkill but it's necessary.
This is also a good time to invert the selection and make a bunch of these using different colors/hue/saturation. Make sure you save the original first.
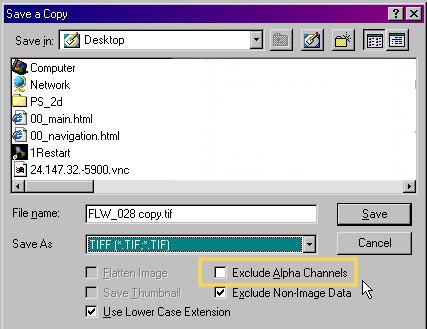
22.0 Now, to make this work with Photoshop 5.5 you must Save a Copy
Not Save, Not Save as... But Save a Copy.
This is the only way to get the save options you need. In ver 5.5 anyhow.
In ver 6.0, I've been told that the default, Save keeps the Alpha intact. [Thanks Rick]
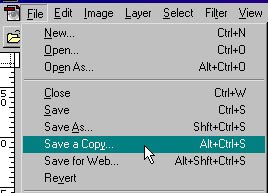
23.0 Save a Copy as tif\tga, this will embed the mask into the image.
Make sure that Exclude Alpha Channels is not selected.
This is the end of the Photoshop Section - remember where the files you saved are.
Have a beer or twenty, it's Bryce time!
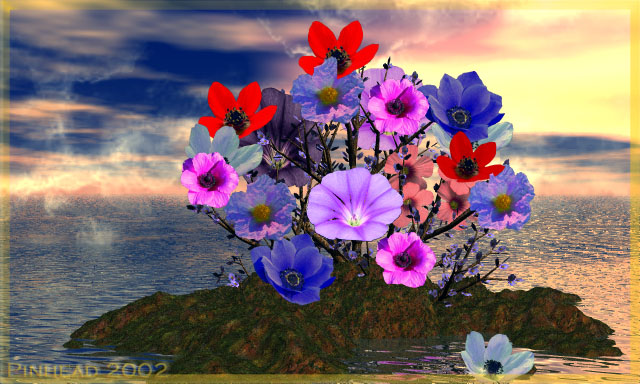
To apply these in any version in Bryce simply click on 'Leo's - Vitruvian Man' [Picture Object] or 2d Face icons on the top toolbar.
Leo is easiest as it takes you directly to the Picture Editor [Loader] where all you have to do is browse and find the Tif you just made. Open it and it will pop into the first picture box on the left. The Alpha automatically loads into the middle and you can see the result at the far right.
Look here for an example.
Change material properties as required by clicking [M] next to the object.
Diffuse and Ambient color as well as Specularity and Bump should be altered as needed to fit your needs.
The technique above is not only for foliage. You can 'cut out' (mask) any object from a photo, use clip art, typefaces, clouds or abstract shapes.
If you see black edges once in Bryce note where they are and go back to Photoshop and either fill with black or erase to background.
Use you imagination...this method is extremely useful for those who don't have model programs or want to add reality to any scene.
Most other 3d programs (C4D, ZBrush, 3dsMax, Rhino, Poser etc,..) can use the transparent properties described.
My thanks to Bob Cox (Meski), Michael Melnick (PusGhetty) and Rick (Lonegunman) for input. Past and present.
There are several zip files of leaves/flowers I made this way for members to download from Bryce Freestuff at 3DCommune.com if you would like to take a look.
Best regards,
Paul a.k.a. Pinhead
Written for 3DCommune.com and your amusement